Every barbershop needs a well-designed, user-friendly website. Whether you’re just starting out or are already an established hairdresser, a website is the key to your business development and success.
According to a recent report, the barbering industry is one of the fastest-growing markets in the US. The male grooming industry is expected to be worth in excess of $40B by 2025. As a result, the barbering landscape is more competitive than ever, and savvy barbershop owners who take advantage of the highly influential world of digital marketing are primed to succeed.
It’s no longer viable to have a presentable shopfront in an area of high foot traffic. Increasingly, people are looking online for the highest rated hairstylist in their locality. Modern hair salons need to have a brand and online presence in order to compete in the contemporary market.
This means having a website that reflects your style, promotes the uniqueness of your salon, and attracts new customers. Thankfully, with Elementor and WordPress you can design a fully-functional and cost-effective barbershop website with no coding experience. Elementor’s features, templates, and drag & drop editor means you can custom-design your very own website without having to hire developers. Here’s how.
What should a barber website include?
Before we begin with our guide to creating the site, we first need to understand the key features of a barbershop website. Here are some of the important pages and elements that every barber website needs:
1. Homepage
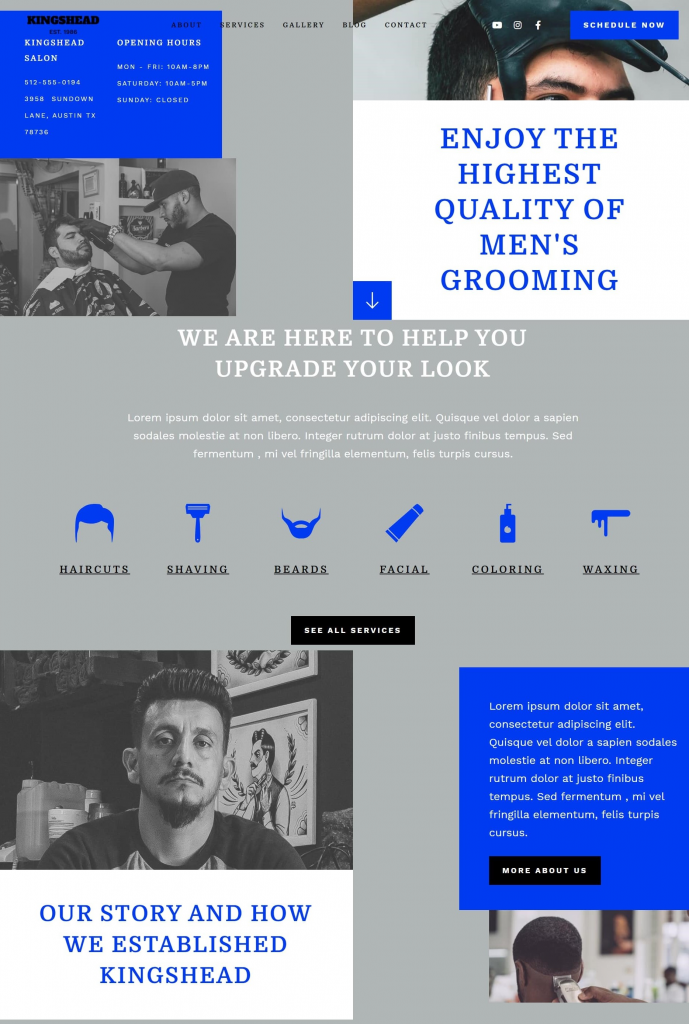
The homepage is the first impression users have of your website. Here, you should include a clear navigational menu that links to the other important pages, as well as noticeable call to action buttons that encourage visitors to take the desired action on the site.
Here you should also showcase some of your best work, the haircutting and styling services that you offer, and other key information about your salon.
2. About us page
A barbershop website isn’t just for appointment settings and price information, it’s your space on the internet to showcase your salon, and the dedicated hairstyling professionals who work there.
A well-crafted about us page allows you to establish your brand and connect with customers on a personal level. It can also help to increase your credibility and trust.
The page should include headshots and bios of the employees, links to their social media channels, and the barbershop’s history.
3. Appointment scheduling
The primary goal of the website is to convert visitors into paying customers. Therefore, you must offer appointment scheduling directly via the website. This page should also include pricing information, no-show or cancellation fees, payment processing, and all other relevant information for clients.
In addition, the page should offer a calendar integration, so customers don’t forget their appointment,
4. Services
This page should detail each and every service you provide. Potential customers use your website to see if you’re the right for their needs. Make sure your services are clearly displayed and aren’t hard to find on the site.
5. Gallery
A gallery page featuring some of your best haircuts and styles helps encourage customers to book their own appointment. This page should also include testimonials from satisfied clients.
6. Shop
If you sell hair styling products in your salon, then you should certainly consider selling these online as well. Use the WooCommerce integration to create an online store, facilitate payment processing and design the checkout process.
7. Blog
Although it’s not vital, a blog could provide a significant SEO boost to your website, and help you to connect with customers, and foster an online community. Here, you can publish content about company updates, reviews of new haircutting products, and styling tutorials.
How to Create a barber Website — A Step-by-Step Guide
Step 1: Choose your domain name
When you set out to create your own website, the first thing you need to do is get a domain name and a web hosting service. Your domain name will allow visitors to access your website.
Step 2: Choose your web hosting plan
The hosting plan will allow you to house all the files that make up your site. Your hosting server is where you will install WordPress and the add-ons mentioned in this tutorial.
What’s great about WordPress hosting is that it’s optimized specifically for WordPress performance, security needs, installation, and onboarding processes. There is a long list of WordPress hosts to choose from, and many considerations to factor into your selection process.
As far as hosting plans go, they range from affordable shared hosting plans to more expensive managed WordPress hosting and premium dedicated servers. To make your lives easier, we recommend several hosting packages that are fully compatible with Elementor.
Once you’ve signed up for your hosting plan, you will receive a welcome email that will have all the details related to your account. Find the login link to your hosting account area and use the username and password to log into your account.
Step 3: Install WordPress
The next step is to install WordPress. After you have logged in to your hosting account, click on the My Accounts tab and then log in to your cPanel. In cPanel, click on the WordPress icon in the auto-installers area and follow the steps to install WordPress.
After WordPress has been installed, go ahead and visit your WordPress site. Enter the name and password you’ve set up and click Log In to access your WordPress dashboard.
(Textual link) See our full guide on how to install WordPress here: How to Install WordPress
Once you’ve downloaded and installed the WordPress software, you can take advantage of the WordPress CMS platform. The flexibility of WordPress lets you choose from tens of thousands of WordPress templates, themes, and plugins.
Step 4: Install Elementor
The next step is to install Elementor, a visual website builder that greatly simplifies the WordPress website building process. Sometimes, WordPress can be an intimidating tool that seems too complex to use on your own. However, by using a visual site builder, you can create your site quickly, efficiently, and comfortably.
In your WordPress dashboard, navigate to Plugins > Add New. Search for Elementor Website Builder and click Install. When Elementor has been installed, click Activate.
While Elementor is free, depending on the features you want you’ll also need Elementor Pro to take full advantage of Elementor’s capabilities. Visit vvdryvat.top and purchase the Pro version of the plugin then install and activate it in the same manner as above. Once Elementor Pro has been installed, you’ll need to enter your license by going to your WordPress dashboard and navigating to Elementor > License.
Because you’re going to be using Elementor Theme Builder and your template kit to design your entire website, you don’t need to look for any design elements in your active WordPress theme.
Instead, you just want the most lightweight, performance-optimized foundation, which is what the Hello theme from Elementor provides.
To get started, go to Appearance → Themes → Add New and search for “Hello Elementor”. Then, install and activate the theme.
Step 5: Choose a Barber Template Kit
Once you’ve installed Elementor, the next piece of the puzzle is a barber website template kit. These are individual sets of templates needed for a complete WordPress website: Header, Footer, 404 page, Blog Archive, Single Post, Single Page, Popup, and more.
Our Template Library features websites of many niches, each kit catering to the needs of our user community. These include portfolio sites, digital agency sites, magazine sites, beauty salons, and so much more.
Elementor template kits are also offered by creative marketplaces, such as Envato or ThemeForest.
For this tutorial, we’ll use the Elementor boutique barbershop template

To install the kit, first, create a page called “Home” and click the Edit with Elementor button to launch Elementor.
Then, open the Elementor template library and search for “barber” under Pages. Once you’ve found your desired template, simply click on install.
For more information about installing the kit, see here: Create a Complete Website Using Elementor Kits and Theme Builder
Step 6: Customizing the template kit
Once you have downloaded and installed the kit, you can use the drag & drop editor to customize each and every aspect of the design and layout to tailor it to your needs.
You can change the logo, color scheme, navigation links, website copy, and any other feature that you wish. You can also use the Elementor widgets to add specific functionalities to your website like a custom donate button.
To learn more about customizing your template, visit our help center.
You can also read our thorough guide to creating your Elementor website here.
Step 7: Publish the website
Once you’re completely satisfied with your website’s design, interface, and functionality, then it’s time to publish it live.
- To preview the site, click the icon.
- If you are satisfied with the result, go ahead and click the button.
- Click ‘Have a Look‘ to view the published page
Conclusion
Creating a well-designed, and a fully-functional website for your barbershop can be a smooth, seamless process with Elementor’s template kits. No coding required, simply download and install Elementor onto your WordPress site, choose your desired template kit, customize, and publish.
