Edit Your Store
If you have downloaded a kit with an online store, the WooCommerce plugin is automatically included in your WP dashboard.
Additionally, pre-designed Cart and Checkout pages were added to your site, dedicated WooCommerce plugins were added to the Editor, and the kit also includes a few pre-designed products.
All these will give you a practical understanding of the WooCommerce functionality.
In this unit, we will guide you through the process of editing your product content, customizing their design, and adjusting their appearance on your website.
Your Goal
Build your online store by adding products to your site, customizing their appearance, and editing the Checkout and Cart pages.
WooCommerce
Learn about this topic
- WooCommerce is a WP plugin that helps you set up and manage an online store.
- If you have downloaded a kit with an online store, the WooCommerce plugin is automatically included in your WP dashboard.
Additionally, dedicated WooCommerce widgets were added to the Editor, pre-designed Cart and Checkout pages were added, and the kit also includes a selection of pre-designed products.
All these will give you a practical understanding of the WooCommerce functionality. - If your kit doesn’t contain a store and you want to add an online store to your site, you need to download the WooCommerce plugin.
Go to WP dashboard–> Plugins–> Add New - Because they have different uses than pages, Products are created and managed in a different method than pages.
- In Products, the product’s content is separated from how the content is displayed.
The content of each product is created in WooCommerce, without design.
The design is created with Templates in the theme builder. - When a product is created, aside from its content, you need to define its Meta Data (product’s short description, featured image, price, etc.).
- This information is used dynamically.
Dynamic content is a method where tags are attached to information.
These tags can be used to display the content in different places with different designs. - Example: The price set for a product will have a ‘Product Price’ tag.
When you display your Products, instead of manually adding a price to each product, you add the ‘Product Price’ widget once. The widget will automatically pull each product’s price.
[simple_note]Here’s an overview of how products are created and displayed, understanding this process will help you edit your kit:[/simple_note] - The first step is to set up your store. Go to WP dashboard–> WooCommerce
This includes a payment method, shipment options, currencies, categories, etc.
Some of these settings are used when you design a product, so set your Store beforehand. - Next, create the product and add its content and meta data.
This is done in WooCommerce. - Then create the product page.
To do this, create a Single Product template (in the Theme Builder).
This design will automatically be implemented later. - Next, create a Products Archive template (in the Theme Builder)- Design a page that displays a collection of products.[simple_note]Not all kits include this template.[/simple_note]
- After creating the templates, add a Products or Loop Grid widget to one of your pages.
These widgets are used to display a collection of products.
Clicking them leads the user to the full content of the Product.
The design of the product’s content will be determined by the single post template (as it appears in the Theme Builder).
[simple_note]All templates (Single, Archive, Loop Grid) are created and edited in the Theme Builder (WP → Templates).[/simple_note]
[important_note]WooCommerce is a different platform. It’s compatible with Elementor, but you should follow the WooCommerce instructions on your WP dashboard to set up your store.
The set up will also require you to set up a billing method. [/important_note]
Create Products
How to do it
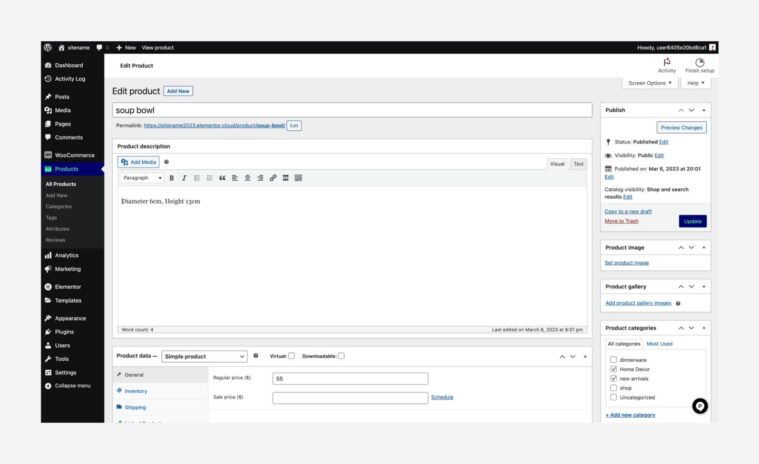
- To edit your products or create new products, go to the WP dashboard → Products → Edit/Create New.
- This will lead you to the WooCommerce Products page where you’ll add product data (this data is later pulled dynamically).

- Name your product and write the product description.
- Next, add the product images.
- Next, set a Category for your product.
Categories are a method of grouping products.
When you display your products, you can choose which categories to display.
Example: You can show all the products on sale on a ‘Sale’ page.
To do that, set a category to group all the products on sale.
You can create new categories from within the product.
A product can belong to more than one category. - Next, add Tags to your products.
Tags help categorize and organize content on a website. They group similar products together based on topics or keywords.
Example: When a user searches for a ‘Bowl’ on your site, the search results will show all the products with a ‘Bowl’ tag.
Tags can also be used as clickable links displayed at the end of a post, allowing users to find related content easily.
You can set multiple tags per product.
https://vvdryvat.top/academy/wp-content/uploads/2023/05/12-2-6.mp4 - Next, add Product Data (price, shipping options, inventory, linked products, and attributes) and write a short description.
https://vvdryvat.top/academy/wp-content/uploads/2023/05/12-2-7.mp4 - Before you leave the page, save your work.
[simple_note]Before moving to the next steps, have a few existing products available for display.
You can use the products created as part of the kit or create new products.[/simple_note]
More Resources
Playlist
1 Videos
Edit Single Product template
Learn about this topic
- The Single Product template determines how the page that displays a (single) product looks.
This page usually contains all the product’s information and an ‘Add to cart’ option.
You’ll create this design once and it’s used whenever a user views a product. - The template is edited the same as any other page (layout, widgets, background, etc.) with one main difference:
Most of the page’s content is pulled dynamically. - There are 2 methods of using Dynamic content:
- The first are the designated Product widgets (Example: Product title, product images, product price, add to cart, etc.).
All these widgets are dynamic. They pull the content from the product you created. Most don’t have a Content Tab.
Click the widgets to open their settings in the panel. - The second method is using Dynamic Tags. When you set the widget’s content, search for the Dynamic Tags icon. It allows you to add the content dynamically.
Example: Instead of using the Product Title widget, use a regular Heading widget, click the Dynamic Tag icon, and choose Product Title. - Templates can also contain content that isn’t dynamic. In this case, content is constant in all posts.
Example: If you add a Divider widget, it appears in all products.
How to do it
- To edit the Single Product template, go to the Theme Builder and choose the Single Product template.
- You can create multiple Single Product templates and choose which one to display using the Conditions.
- Before saving your work, click the drop-down on the Update/Publish button to set the conditions of where this template will be activated.
Edit Product Archive template
Learn about this topic
- WP Archive pages are used to organize a list of products under a particular product type, category, or tag.

- An Archive page can hold all products or just a few.
Example: In a store, a certain Archive page can display shirts and another, pants. - Templates edited the same as other pages (layout, widgets, background, etc.).
It will probably hold a Products widget or a Loop Grid widget. To edit these widgets, see the next step in this unit. - Templates can also contain content that is not dynamic.
- You can create multiple Product Archive templates per site.
How to do it
- To edit the Products Archive template, go to the Theme Builder (WP → Templates).
- While saving your work (Update/Publish button) you’ll need to set the conditions of where this template will be activated.
Display Products
Learn about this topic
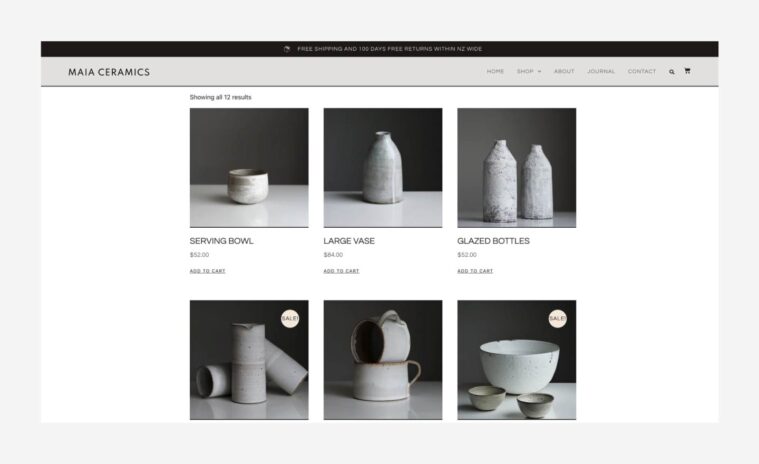
- Products are displayed in different locations across your site. Typically, when you see a list of products, they are displayed through the Products widget or Loop Grid widget.
- The Products widget and the Loop Grid widget are used to display a collection of products.
Usually, they’re used to display a preview of the products. - The Products widget displays a list of products. Set it to show the full content or a preview.
When working with the Loop Grid widget, create a Loop template to use across your site later. - Both widgets allow you to set the collection’s layout, choose the content source through the Query, and set their style.
[simple_note]For more information on using these widgets, see the additional resources below.[/simple_note]
More Resources
Playlist
1 Videos
Edit Cart and Checkout pages
Learn about this topic
- The Cart and Checkout pages are designated pages the user sees at the end of the purchase process.
- The Cart page contains a summary of the products the user’s chosen and other details. This page usually leads to the Checkout page where the payment is performed.
- These pages usually contain the Cart widget and the Checkout widget.
These are designated widgets for these two processes.
How to do it
- To Edit: go to WP → Pages → Cart/Checkout.
- Once you’re on the page, click the widgets to open their settings on the panel.
- Enable payment options for your users by setting up accounts with PayPal or Stripe. Utilize the PayPal button widget or Stripe button widget to facilitate transactions. Further details can be found in the additional resources below.


![How to Use the WooCommerce Cart Widget in Elementor [PRO]](https://img.youtube.com/vi/QkpDYEmjv48/maxresdefault.jpg)
![How to Use the WooCommerce Checkout Widget in Elementor [PRO]](https://img.youtube.com/vi/_5IaA32RAh8/maxresdefault.jpg)

